Account Payables (Please complete SRIR process)
GRIR & SRIR ACCOUNTING PROCESS
1. Purpose
The GRIR & SRIR Accounting Process is used to record the accounting value of goods and services that have been received before the supplier invoice is processed.
The process ensures that the company's accounting records reflect goods or services received and the corresponding liability, even where the vendor invoice has not yet been matched.
2. GRIR – Goods Receipt Accounting
GRIR is used for physical goods/products received against a Purchase Order.
Process
Open the relevant Purchase Order.
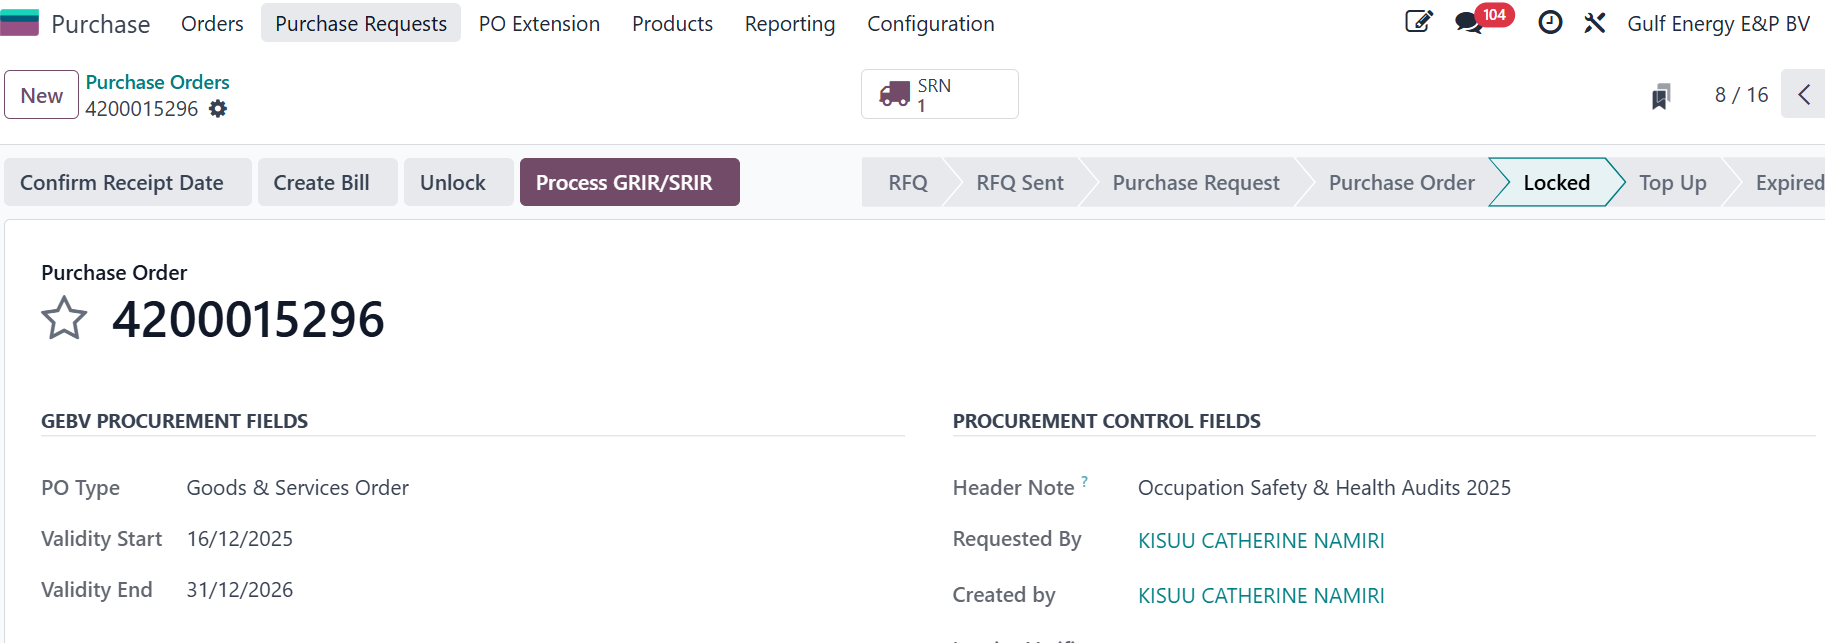
Confirm that the goods have been physically received.
Ensure the relevant Goods Receipt has been completed.
Click the GRIR button.
The system reviews each Purchase Order line that has not yet been processed.
Section headers and notes are automatically ignored because they are not product lines.
The system checks the quantity received against the quantity ordered.
If No Goods Have Been Received
If the ordered goods have not been received, the system will not create an accounting entry.
The following error message is displayed:
"Goods have not been received, please receive first!"
The goods must first be received before the GRIR accounting entry can be processed.
If the Full Quantity Has Been Received
When the full ordered quantity has been received:
The system creates an accounting entry for the full value of the received goods.
The value is transferred from the GRIR holding account to the relevant expense/GL account configured for the item.
The accounting entry is posted because the goods have already been received.
If the Quantity Has Been Partially Received
Where only part of the ordered quantity has been received:
An accounting entry is created for the quantity already received.
The received portion is posted immediately.
A separate entry is created for the outstanding/unreceived quantity.
The outstanding portion remains Draft/Unposted.
The draft entry is only posted when the remaining goods are received.
3. SRIR – Service Receipt Accounting
SRIR is used for service lines that have specifically been configured to require a Service Receipt.
The process follows the same principle as GRIR, but uses the SRIR holding account instead of the GRIR account.
Process
Open the relevant Purchase Order.
Identify the service line requiring a Service Receipt.
Confirm that the service has been received.
Complete the applicable Service Receipt.
Click the GRIR/SRIR accounting button.
The system checks each eligible service line that has not already been processed.
The system determines the received and outstanding portion.
If the Service Has Not Been Received
No accounting entry is created.
The process will not proceed until the service has been received.
If the Full Service Has Been Received
The system:
Creates an accounting entry for the full service value.
Moves the value from the SRIR holding account to the GL account configured on the service line.
Posts the accounting entry.
If the Service Has Been Partially Received
The system:
Posts the accounting entry for the received portion.
Creates a separate draft/unposted entry for the outstanding portion.
Keeps the outstanding amount unposted until the remaining service is received.
4. Processed Lines
Once a Purchase Order line has been successfully handled, the system marks the line as Processed.
This prevents the same line from being processed again.
When the GRIR/SRIR button is clicked again:
Previously processed lines are skipped.
Only unprocessed eligible lines are considered.
Section headers and notes are skipped.
No duplicate accounting entries are created for already processed lines.
5. Accounting Treatment
Goods – GRIR
GRIR Holding Account → Item Expense/GL Account
The GRIR account temporarily holds the value of goods received before the corresponding supplier invoice is processed.
Services – SRIR
SRIR Holding Account → Service GL Account
The SRIR account temporarily holds the value of services received before the corresponding supplier invoice is processed.
6. Partial Receipt Treatment.
| Receipt Status | Accounting Treatment |
| Not Received | No accounting entry; system displays an error |
| Fully Received | Full value is posted |
| Partially Received | Received portion is posted |
| Outstanding Portion | Created as draft/unposted |
| Line Already Processed | Skipped to prevent duplication |
7. Overall Process Flow
Goods
Purchase Order → Goods Receipt → GRIR → Accounting Entry → Processed
Services
Purchase Order → Service Receipt → SRIR → Accounting Entry → Processed
Partial Receipt
Purchase Order → Partial Receipt → GRIR/SRIR → Received Portion Posted → Outstanding Portion Draft → Remaining Receipt → Outstanding Entry Posted
8. Key Controls
The GRIR/SRIR process provides the following controls:
Accounting entries cannot be created before goods or services are received.
Only eligible and unprocessed lines are considered.
Partial receipts are correctly split between received and outstanding quantities.
Outstanding quantities remain unposted until they are actually received.
Processed lines cannot be processed again.
Duplicate accounting entries are prevented.
Goods and services use separate holding accounts where configured.
Service values are posted to the GL account configured on the service line.
Validation rules the bank expects payment files to adhere to
RFQ Creation
1. Vendor bank account number: Numeric value not exceeding 16
characters; should not contain spaces.
2. Vendor name: Alphanumeric value not exceeding 35 characters;
should not contain special characters (e.g., &, *, (, )).
3. Vendor bank and branch code (sort code): Numeric value not
exceeding 5 characters.
4. Paying account(Account number from the payment journal): Numeric
value not exceeding 10 characters.
5. Currency code: 3-letter text value.
6. Amount: Numeric value not exceeding 16 characters
How to create a new RFQ
- Log in to the ERP with a user account which has access to the Purchase module
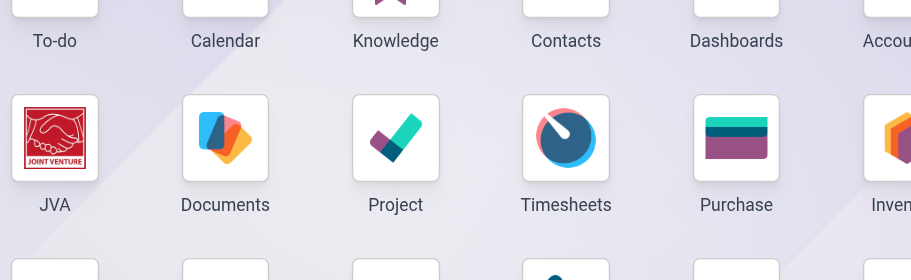
- Open Purchase module and click 'New'
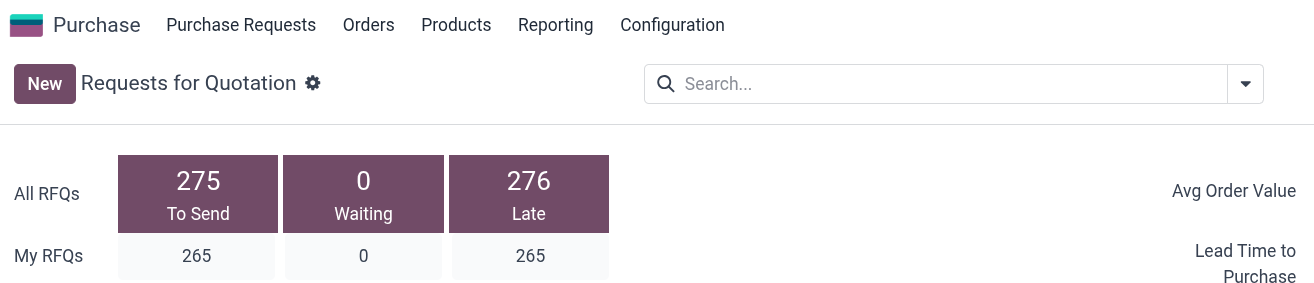
- This opens the create new RFQ, with the required field being the vendor's name and additional fields as follows:
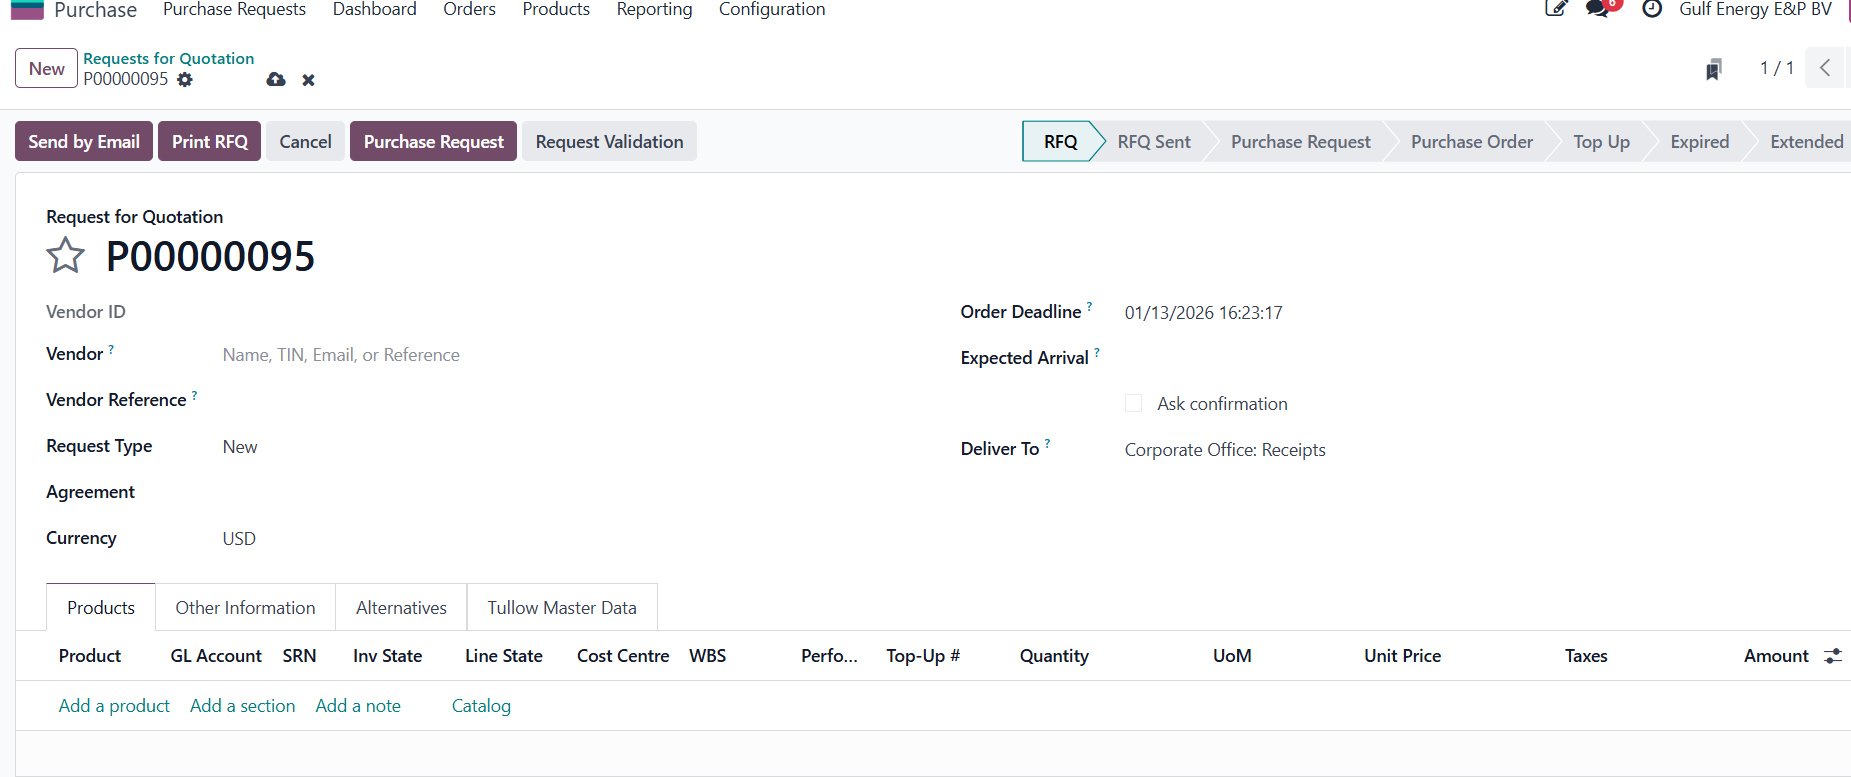
- Vendor Name: Select vendor name from the drop down, this automatically fills the vendor ID from the system
- Order Deadline: The system will always have this as current date and time but this can be changed to any desired date and time
- Expected Arrival: This is the date and time that you expect the vendor to deliver the goods, or services - leave blank for system to automate based on past delivery times of the vendor.
- Vendor Reference: Input the reference from the vendor if available else leave this blank
- Request type Must be New Used when this is a first-time request, no previous order, contract, or budget exists
- Agreement: If there exists a Purchase agreement with the vendor for blanket orders this can be selected here
- Deliver To: Should be the warehouse where delivery will be done to, by default is the Corporate Office Receipts
- Currency is the currency of the order, default is the company currency which is USD
- Click on the 'Add a product' link to populate the products of the RFQ.
How to create a top-up RFQ.
- Log in to the ERP with a user account which has access to the Purchase module
- Open Purchase module and click 'New'
- This opens the create new RFQ, with the required field being the vendor's name and additional fields as follows:
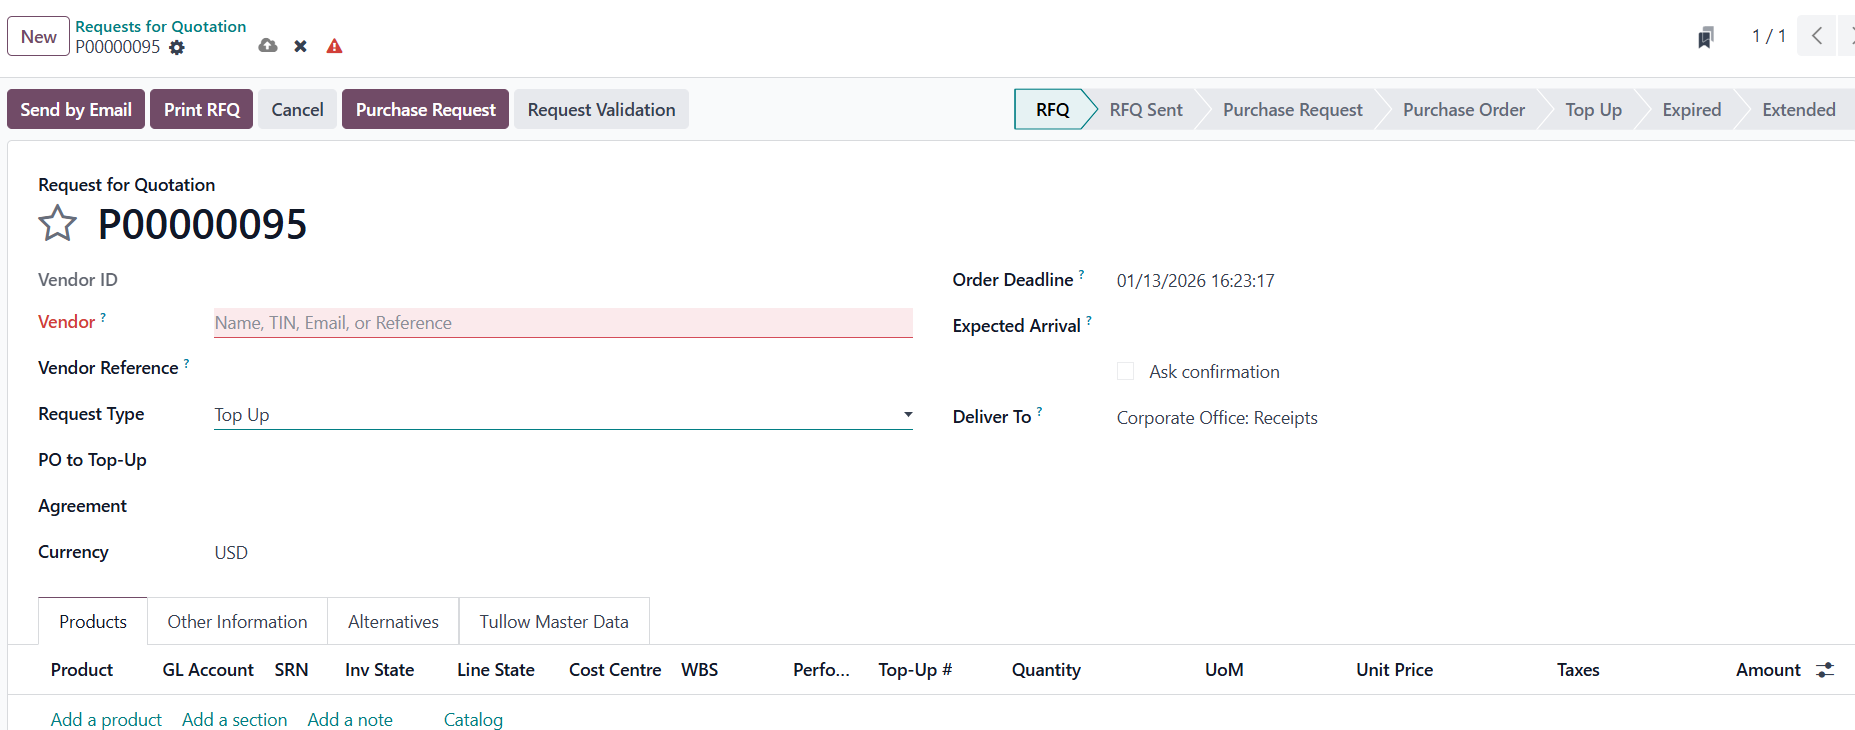
- Vendor Name: Select vendor name from the drop down, this automatically fills the vendor ID from the system
- Order Deadline: The system will always have this as current date and time but this can be changed to any desired date and time
- Expected Arrival: This is the date and time that you expect the vendor to deliver the goods, or services - leave blank for system to automate based on past delivery times of the vendor.
- Vendor Reference: Input the reference from the vendor if available else leave this blank
- Request type Must be Top-up-Used when you are adding more to an existing approved request
The original request already exists, but the amount/quantity is not enough.
Example: Increasing quantity from 10 to 15 items, Adding extra funds to an existing budget line
f. PO to Top-Up-Input or select the PO number to be affected.
g. Agreement: If there exists a Purchase agreement with the vendor for blanket orders this can be selected here
h. Deliver To: Should be the warehouse where delivery will be done to, by default is the Corporate Office Receipts
I. Currency is the currency of the order; default is the company currency which is USD
- Click on the 'Add a product' link to populate the products of the RFQ.
How to create an extension RFQ
- Log in to the ERP with a user account which has access to the Purchase module
- Open Purchase module and click 'New'
- This opens the create new RFQ, with the required field being the vendor's name and additional fields as follows:
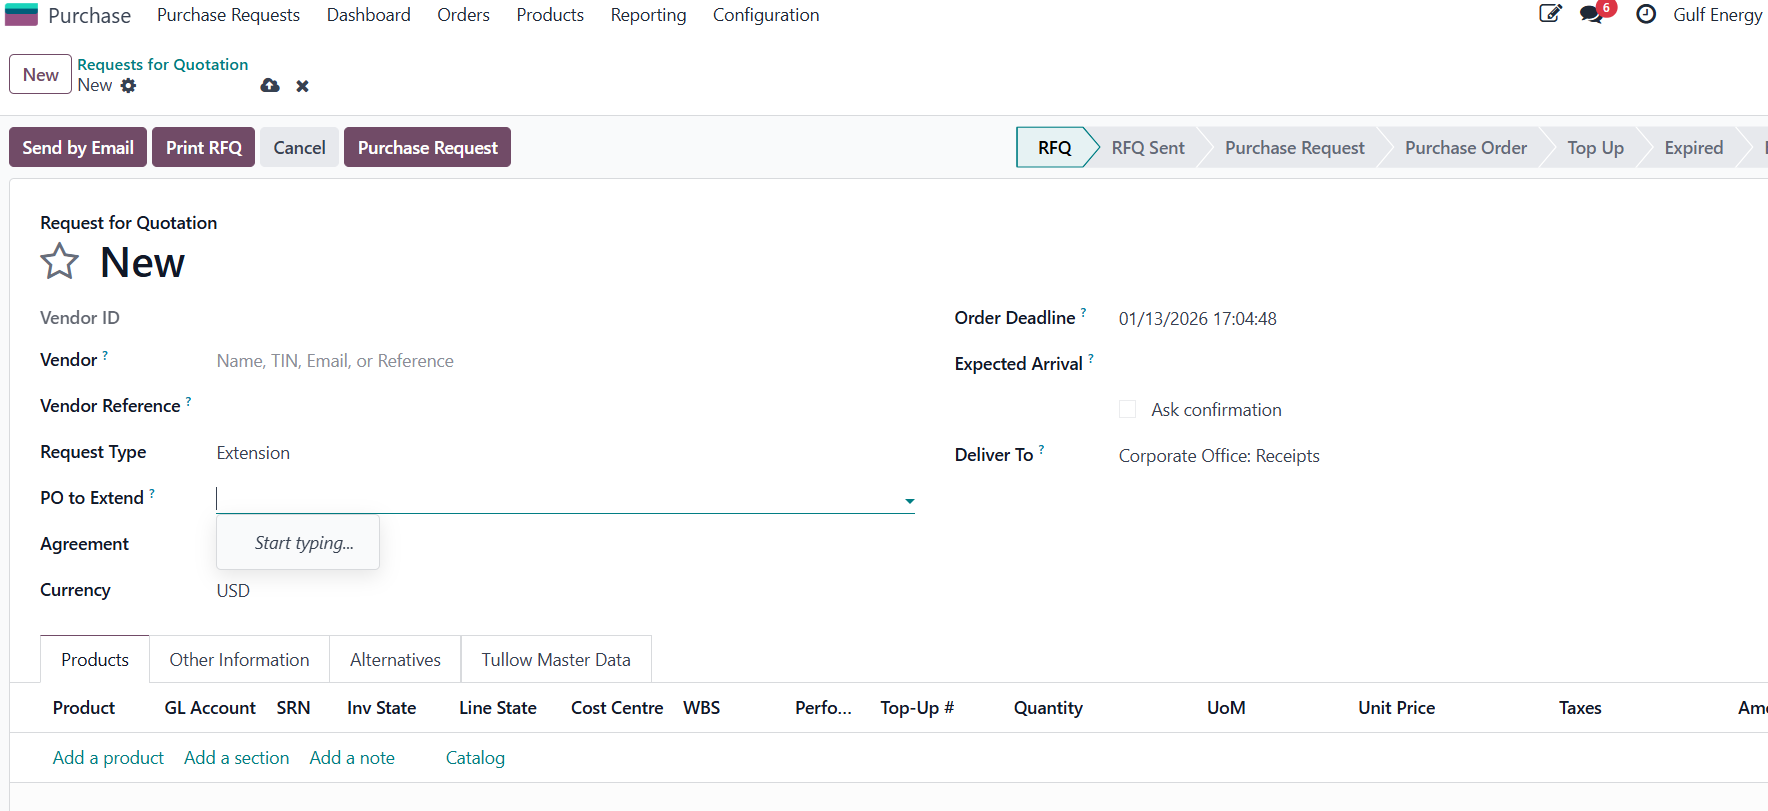
a). Vendor Name: Select vendor name from the drop down, this automatically fills the vendor ID from the system
b). Order Deadline: The system will always have this as current date and time but this can be changed to any desired date and time
c). Expected Arrival: This is the date and time that you expect the vendor to deliver the goods, or services - leave blank for system to automate based on past delivery times of the vendor.
d). Vendor Reference: Input the reference from the vendor if available else leave this blank
e). Request type Must be Extension-Used when you are extending the duration of an existing request or contract. No change (or minimal change) in quantity or amount just time Example: Extending a service contract for 3 more months, Renewing a lease or maintenance agreement.
f). Extension PO- Input/select a PO that must be affected.
g). Agreement: If there exists a Purchase agreement with the vendor for blanket orders this can be selected here
h). Deliver To: Should be the warehouse where delivery will be done to, by default is the Corporate Office Receipts
I). Currency is the currency of the order; default is the company currency which is USD
9. Click on the 'Add a product' link to populate the products of the RFQ.
How to send an RFQ to vendor.
1.Log in to the ERP with a user account which has access to the Purchase module.
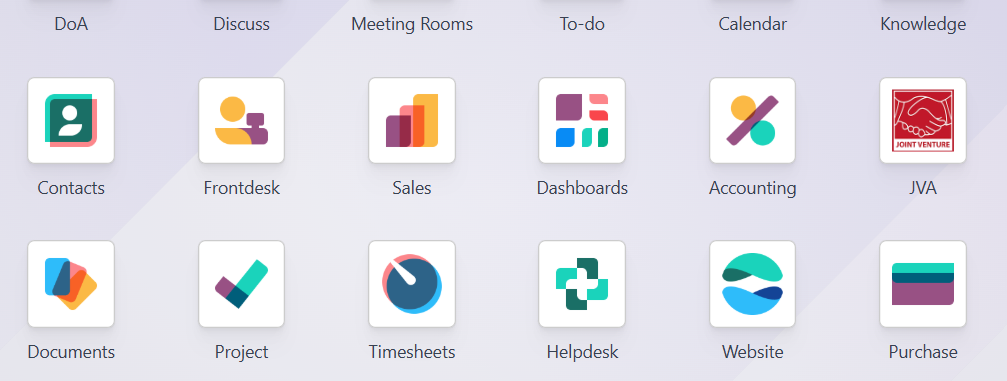
2.Under purchase Requests. Select Request Quotation. 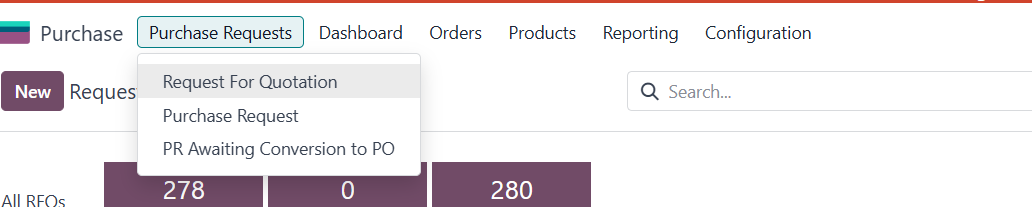
3.Filter to RFQs
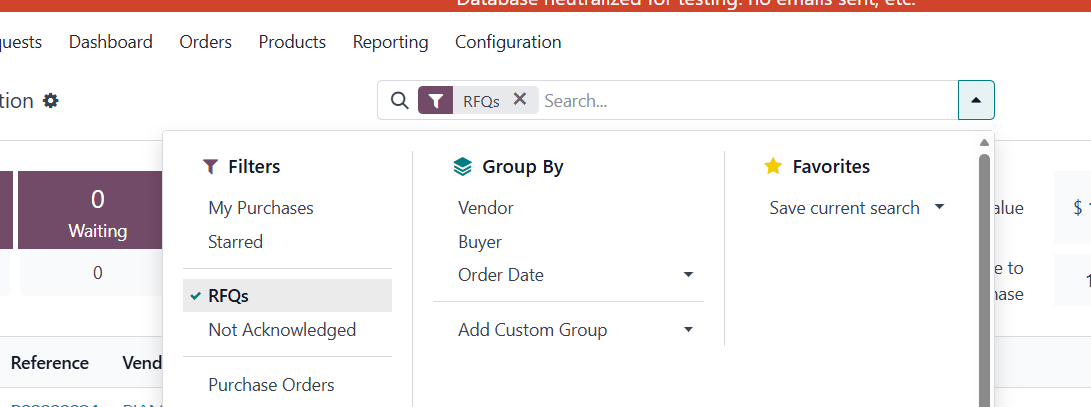
4.Select/Search from the list of RFQs the required RFQ to be sent and open it.
5.Click on send by email.
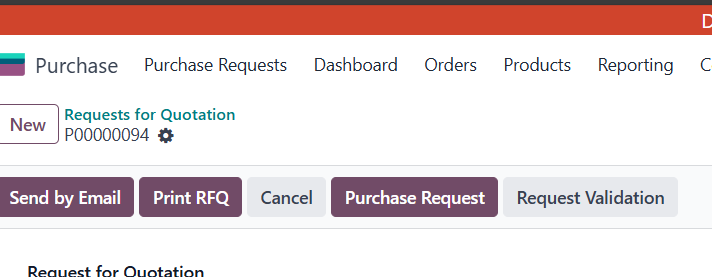
6.Click on Send by email and its shows the fields as follows: 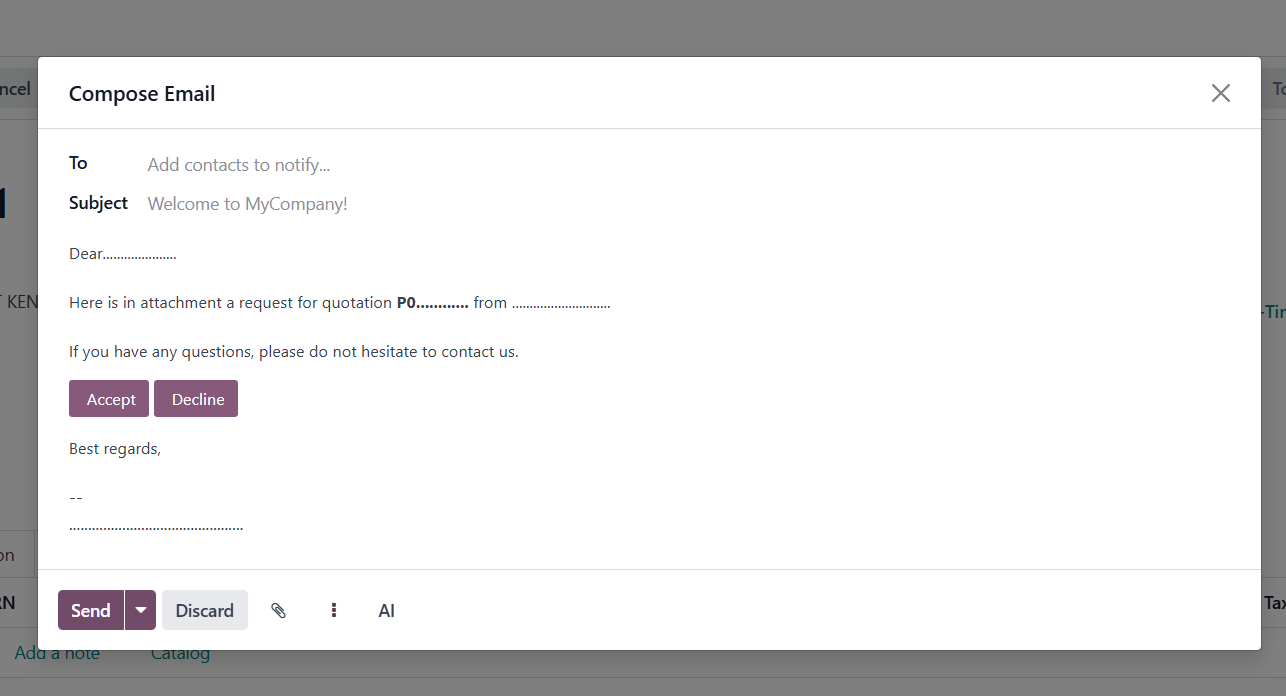 To: This is where you select the recipient. You can add multiple contacts from your database or type in a new email address.
- Subject: The title of your email as it will appear in the recipient's inbox. Odoo often pre-fills this based on the document you are sending (e.g., "Welcome to My Company!").
- Message Body: The main area where you write your message. It currently shows a template for a Request for Quotation (RFQ), including dynamic placeholders like "P0..." for the order number.
- Accept / Decline Buttons: These are call-to-action buttons embedded in the email that allow the vendor to respond directly via the Odoo portal.
Icons
-Send: Finalizes and emails the message to the recipients.
- Attachment: Found in the main record view (behind the popup). It allows you to attach physical files, like a scanned copy of a bank receipt or a PDF of the bill.
-Templates: Click this to switch between different pre-written email templates.
- Discard: Closes the window without saving or sending the draft.
How to convert an RFQ to PR.
- Log in to the ERP with a user account which has access to the Purchase module
- Under purchase Requests. Select Request Quotation.
- Select/search the RFQ you want to convert to a PR
- Click on purchase request.
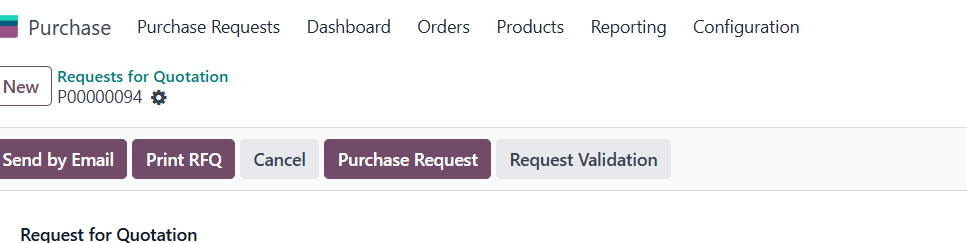
5. This opens the PR with the required field being the PO and additional fields as follows:
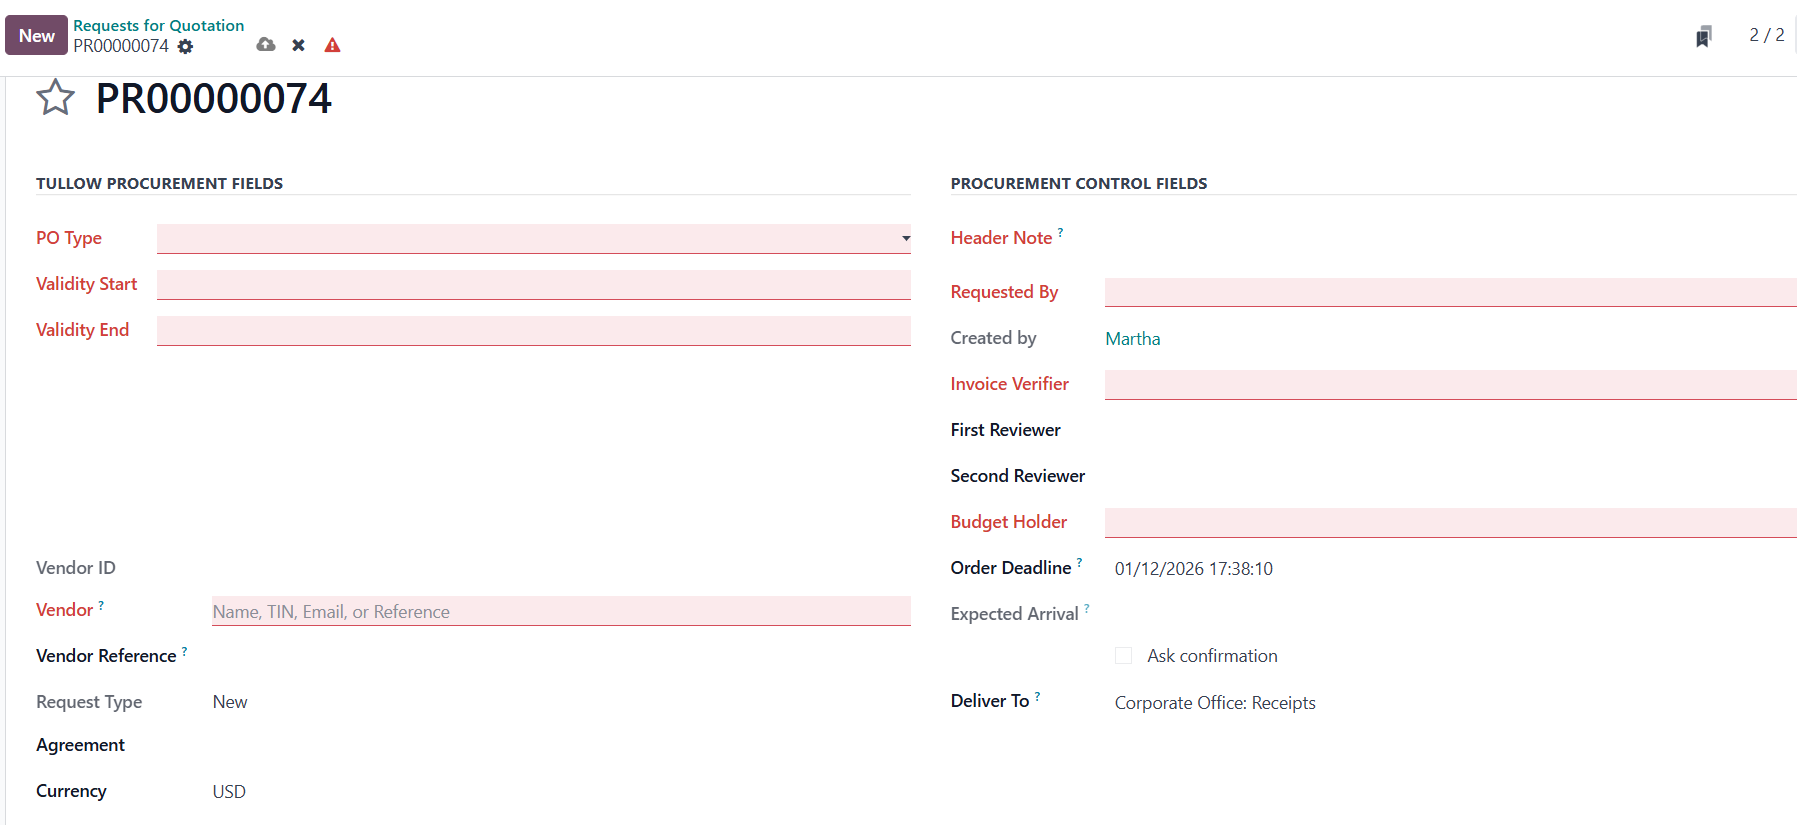
a). PO Type: indicates the nature of the purchase. e.g. Goods Purchase Order. And determine applicable workflows, stock handling, and accounting treatment.
b). Validity Start: Date from which the quotation or request becomes valid. Before this date, the RFQ cannot be confirmed. It helps control when a supplier quotation is acceptable.
c). Validity end: Expiry date of the request. If the RFQ is not confirmed before this date, Odoo can prevent confirmation or require a new RFQ.
d). Vendor ID: Internal system identifier for the supplier. It ensures all purchases, bills, and payments are correctly linked to the same vend
e). Vendor: Name of the supplier being requested or evaluated.
f). Request type: Indicates whether the request is: New – first-time purchase or Replacement / Amendment – modifying an earlier request.
g). Agreement: Links the RFQ to a Purchase Agreement / Call for Tender. Once selected, Odoo automatically loads:
Vendor pricing
Payment terms
Vendor currency
Vendor taxes (if configured)
h). Currency: Currency in which the vendor will quote. Odoo automatically handles currency conversion for accounting and reporting.
i). Header Note: General instructions or comments. The note can be printed on the RFQ or Purchase Order sent to the vendor.
j) Requested by: Person who initiated the purchase request
k). Created by: User who physically created the document in Odoo. Odoo uses this for traceability and approval routing.
l). Invoice Verifier: Person responsible for verifying the vendor invoice. This person is responsible for checking the vendor invoice against: The Purchase Order, Delivered Quantities, agreed prices. Odoo may require their approval before payment is processed.
m). First Reviewer: First level approval authority
n). Second Reviewer: Second approval level (usually management or finance)
o) Budget Holder: Person responsible for the budget being used
p). Order Deadline: Latest date the order must be confirmed
q). Expected Arrival: Expected delivery date of goods
r). On-Time Delivery: Vendor performance indicator
s). Ask confirmation: If checked, vendor must confirm the order, Ensures commitment before fulfillment
t). Delivery To: Physical delivery location. This specifies where goods or services should be delivered.
Odoo uses this to determine: The warehouse, Stock location, Delivery documentation
u). Then proceed to validation.
How to convert a PR to a PO.
1.Log in to the ERP with a user account which has access to the Purchase module 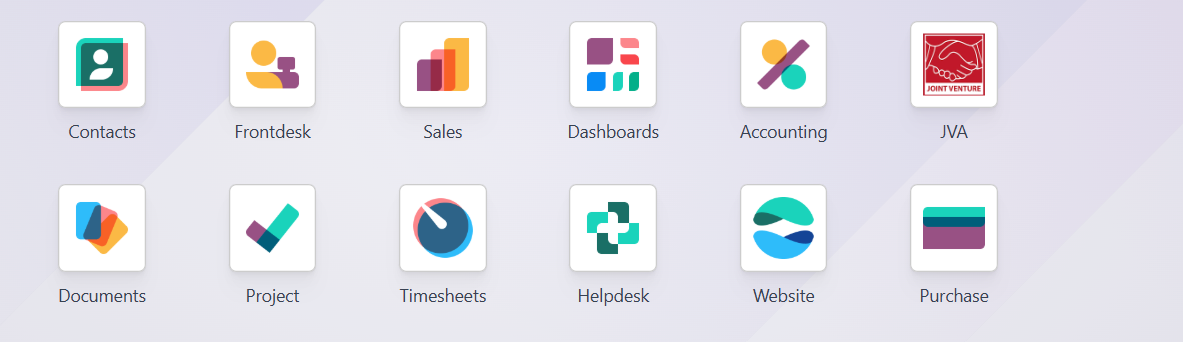
2. Navigate to Purchase Request and Select PR Awaiting Conversion to PO.
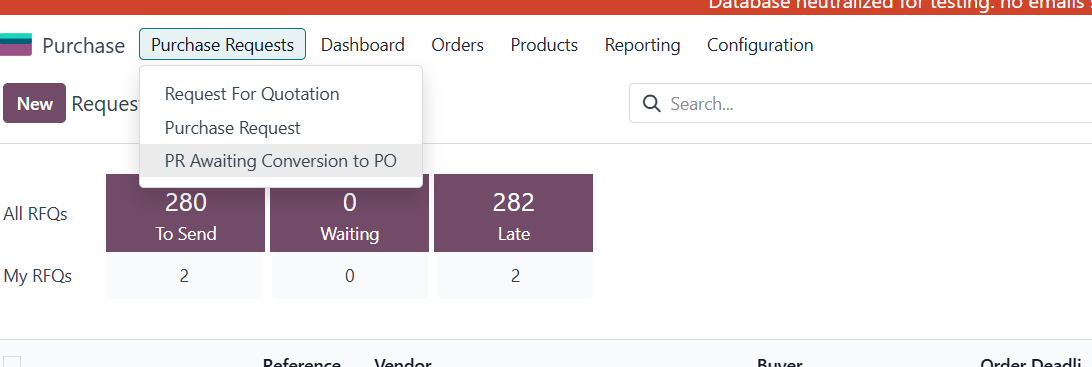
3.Open the PR to be converted to a PO.
4.Once you've opened the PR, click on confirm order. 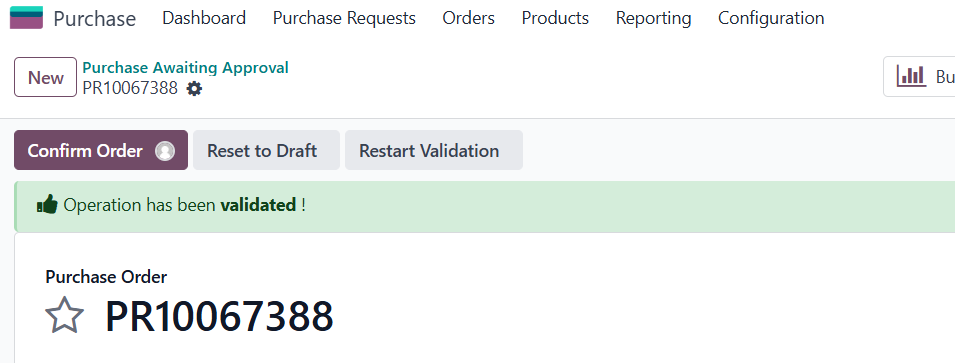
5.Once it is Confirmed, it automatically sets to PO.
6.Under Purchase >orders>purchase orders is where you'll find the PO That you've converted.
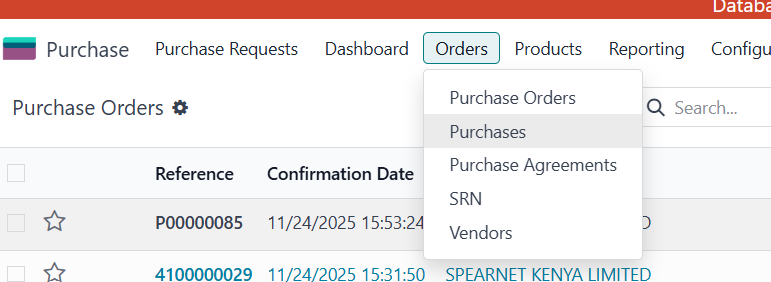
7.Click your PO to open it.
How to top-up a PO.
1.Log in to the ERP with a user account which has access to the Purchase module
2. Open the Top-Up PO go to Purchase → Orders → Purchase Orders
3. Search for the newly created Top-Up PO
4.Click to open it.
2. Check the Reference / Source Document Field Look for a field called “Source Document” or “Reference”
If the Top-Up is linked correctly, it should show:
Top-Up for PO #XXXX
#XXXX = Original PO number.
Receive the goods against the Purchase Order
Verify that the actual quantity received agrees with the quantity delivered.
Validate the receipt.
Where the goods have been received but the supplier invoice has not yet been received, the transaction remains outstanding under GRIR.
The Finance/Accounts Payable team should review outstanding GRIR balances regularly.
Once the supplier invoice is received, navigate to Accounting → Vendors → Bills and create the vendor bill.
Reference the related Purchase Order and receipt.
Verify the supplier, invoice number, quantities, prices, taxes, and other relevant information.
Post the vendor bill.
The system should clear the applicable GRIR balance through the matching of the receipt and supplier invoice.
How to create a bill.
1.Log in to the ERP with a user account which has access to the accounting module. 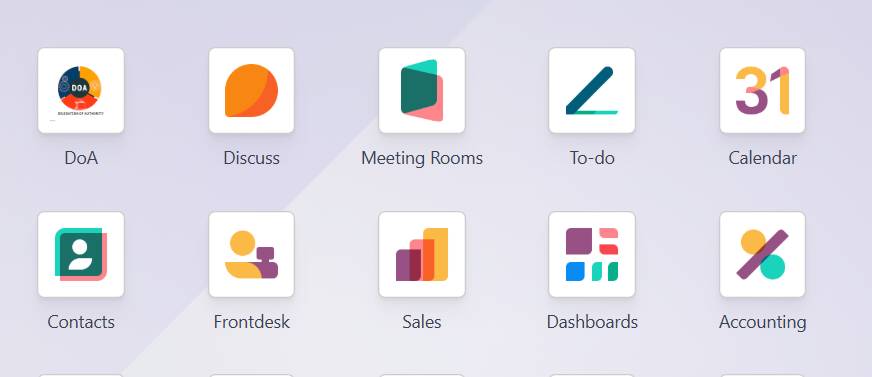
2.To create a vendor bill manually, go to accounting ‣ Vendors ‣ Bills and click New.
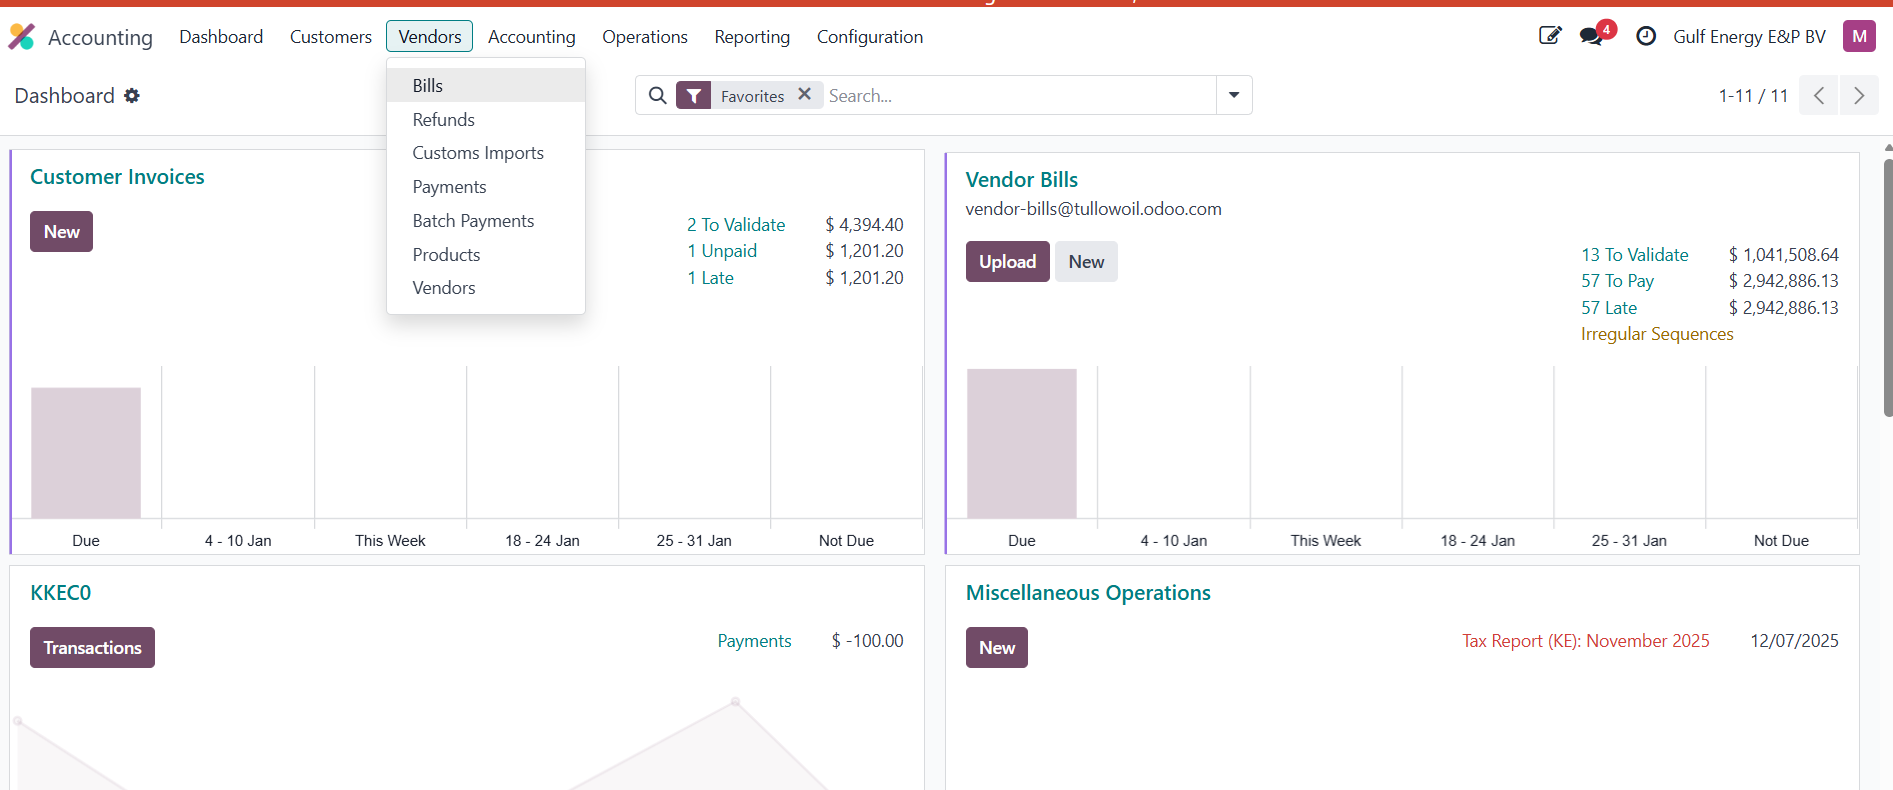
2Fill in the requirements. 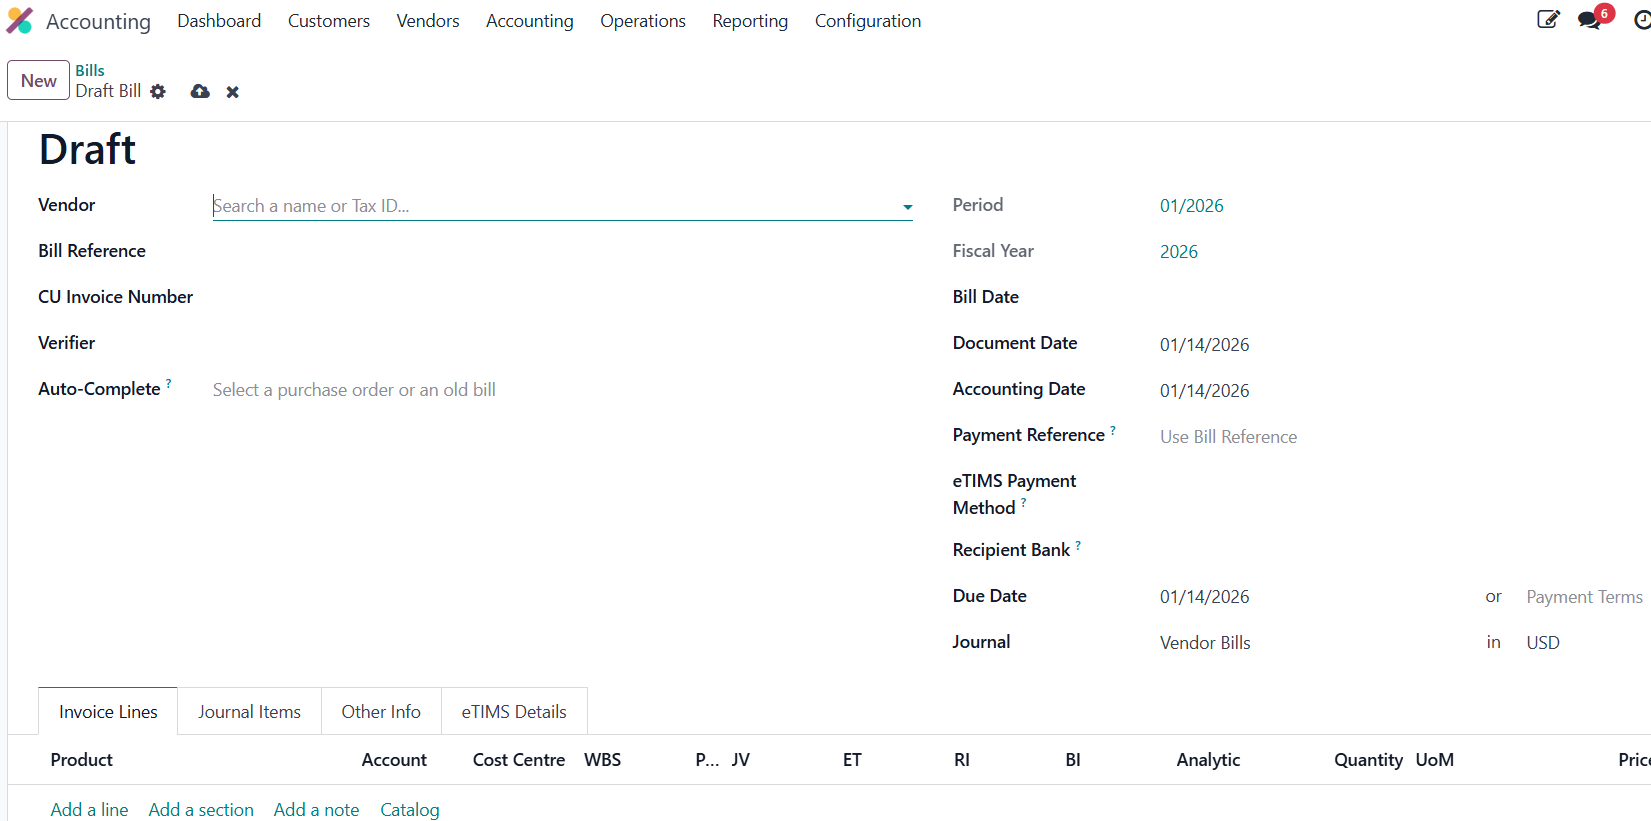
a). Vendor: This identifies the supplier issuing the bill. When selected, Odoo automatically pulls the vendor’s registered details such as name, address, tax identification number, and default payment terms. This ensures the bill is correctly linked to the supplier for accounting, tax reporting, and payment processing.
b). Period: The period represents the accounting month in which the bill is recorded for reporting purposes. In Odoo, this is automatically determined based on the Accounting Date. Users normally do not edit this field directly, but it is used for monthly financial reports and reconciliations.
c), Fiscal Year: indicates the financial year in which the bill is reported. The fiscal year is automatically assigned by Odoo using the Accounting Date. It ensures that expenses are recorded in the correct year for audits, budgeting, and statutory reporting.
d). The bill date is the date shown on the supplier’s invoice. It represents when the vendor officially issued the invoice. This date is important for supplier reference, compliance, and payment term calculations, especially when payment terms are based on the invoice date. COMMENTS: This should be invoice receipt date & not invoice date
e) Document Date: This is the date the invoice was received or entered into the system. It may differ from the bill date if the invoice was received late. This field helps with internal tracking, audit trails, and document control.
COMMENTS: This should be invoice date
f) Accounting Date: The accounting date determines when the bill is posted to the general ledger. This date controls:
The accounting period
The fiscal year
Whether the entry falls in an open or locked period
It is critical for month-end closing and financial accuracy.
g) Bill Reference: An optional reference used for internal tracking. This may be the supplier’s invoice number, delivery note number, or an internal document reference. It helps users search, reconcile and trace documents easily within the system.
h) CU Invoice Number: This is the mandatory official supplier invoice number. It is required for:
Tax compliance
Audit purposes
eTIMS tax reporting
Odoo uses this number to ensure each supplier invoice is unique and traceable.
i) Verifier: The verifier is the person responsible for checking and approving the bill before payment. This role ensures:
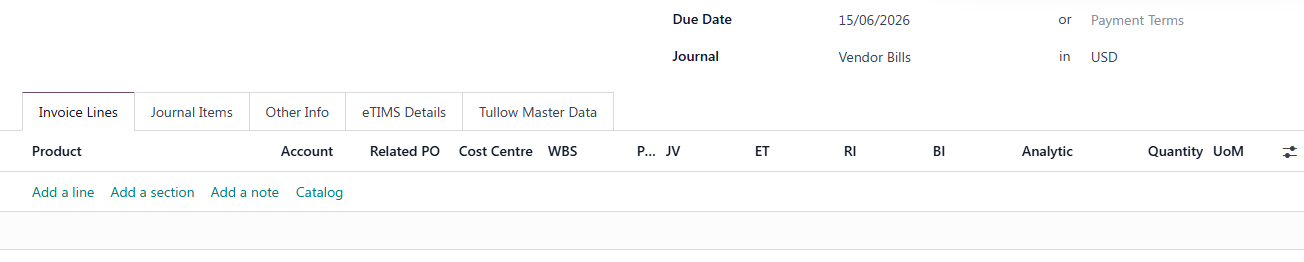
The invoice matches the Purchase Order
Quantities match received goods or services
Prices match the agreed rates
This strengthens internal controls and prevents overpayment.
j) Auto Complete: This feature allows Odoo to automatically populate bill lines from:
A related Purchase Order
A previous vendor bill
It reduces manual entry, prevents errors, and ensures consistency between the PO and the invoice.
k) Payment Reference: This is the reference that will appear on the payment record and bank transaction. It is usually auto generated from the bill reference or invoice number. This helps during bank reconciliation and supplier communication.
l) eTIMS Payment Method: This field captures the method of payment (e.g., bank transfer, cash, mobile money) for Kenya Revenue Authority (KRA) eTIMS reporting. It ensures the payment information sent to eTIMS complies with local tax regulations.
m) Recipient Bank: This specifies the supplier’s bank account where payment will be made. Selecting the correct bank ensures that payments are sent to the authorized and correct destination, reducing the risk of payment errors or fraud.
n) Payment Terms: Defines when the supplier should be paid. Examples include:
Immediate payment
30 days from invoice date
45 days from accounting date
Odoo uses this field to automatically calculate the due date and manage cash flow.
o) Journal: The journal defines how the bill is recorded in accounting. It determines:
The general ledger accounts used
Cost objects
The posting rules
The currency of the transaction
Most vendor bills are posted to the Vendor Bills journal, ensuring consistency in financial reporting.
3.Then confirm the bill to draft

4.After confirmation it now converts draft bill to posted
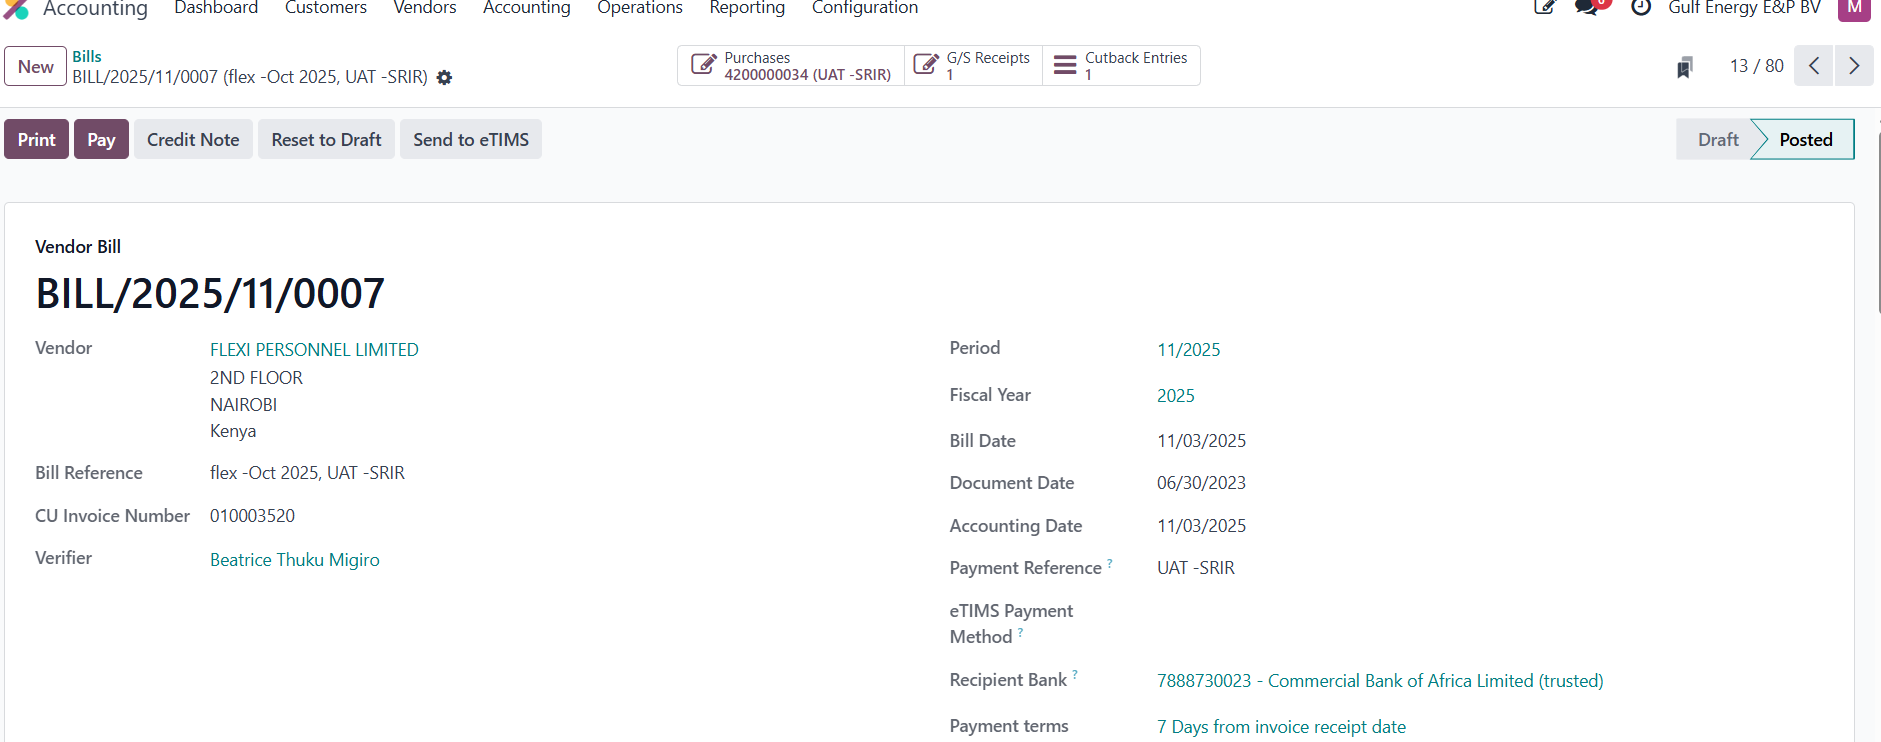
5. Proceed to payments.
How to create a payment
1.Log in to the ERP with a user account which has access to the accounting module. 
2.Navigate to Accounting → Vendors → Bills.
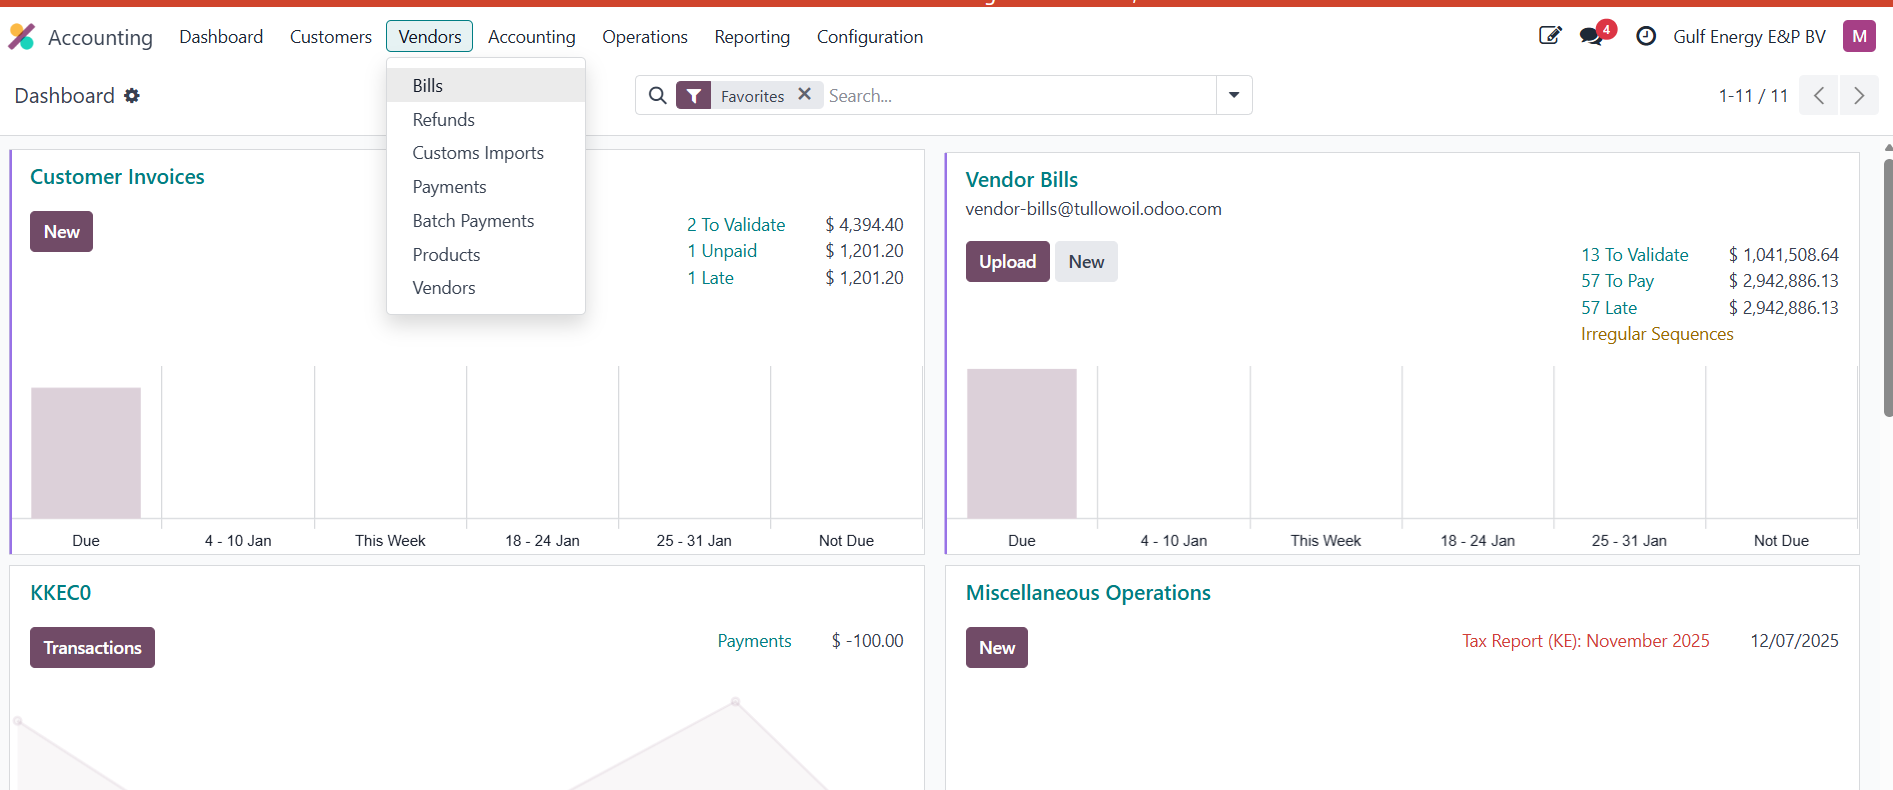
3.Search and open the validated vendor bill you want to pay.
4. Click on pay
5.On clicking on pay, these are the following fields you should fill in.
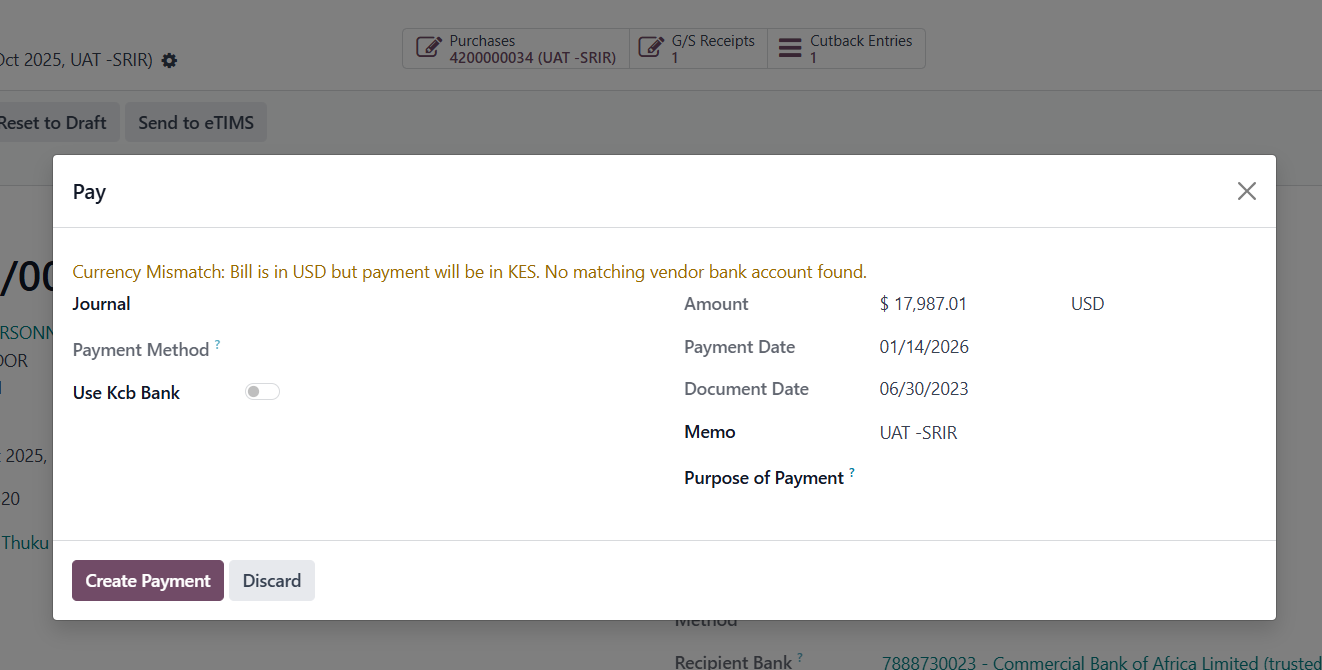
a). Journal -This is the Bank or Cash account you are using for the transaction. It tells Odoo which internal account to deduct money from (for bills) or deposit money into (for invoices). This journal must be configured to allow currency transactions.
b). Payment Methods-This defines how the payment is being processed. Common options include:
- Manually: are you manually making the transfer via your banking portal or writing a physical check. Odoo just records that it happened.
Checks: Used if you intend to print a check directly from Odoo.
SEPA/Electronic: Used for automated bank file exports (common in Europe/US)
c). Recipient Bank Account. -This is the Vendor's bank account where the money is going.Helps in If you are using automated payment files (like SEPA or Wire transfers), Odoo needs this to know where to send the funds.
d). Amount-The total money being paid.
Partial Payments: You can change this number if you are only paying part of the bill. Odoo will keep the bill "Open" with the remaining balance.
Currency: It shows the currency of the bill (USD) and often the equivalent in your company's base currency (KES) based on today's exchange rate.
e). Payment date: The date the transaction actually happened at the bank. This date determines which accounting period the payment falls into, and which exchange rate is used for the conversion.
f). Memo-A short description or reference for the payment. Odoo usually pulls the Bill/Invoice Number (e.g., BILL/2026/01/0001) into this field automatically. It is what usually appears on your bank statement or internal reports to help you identify what the payment was for.
6). Create Payment.
7). It now converts into a Posted Bill in payment. 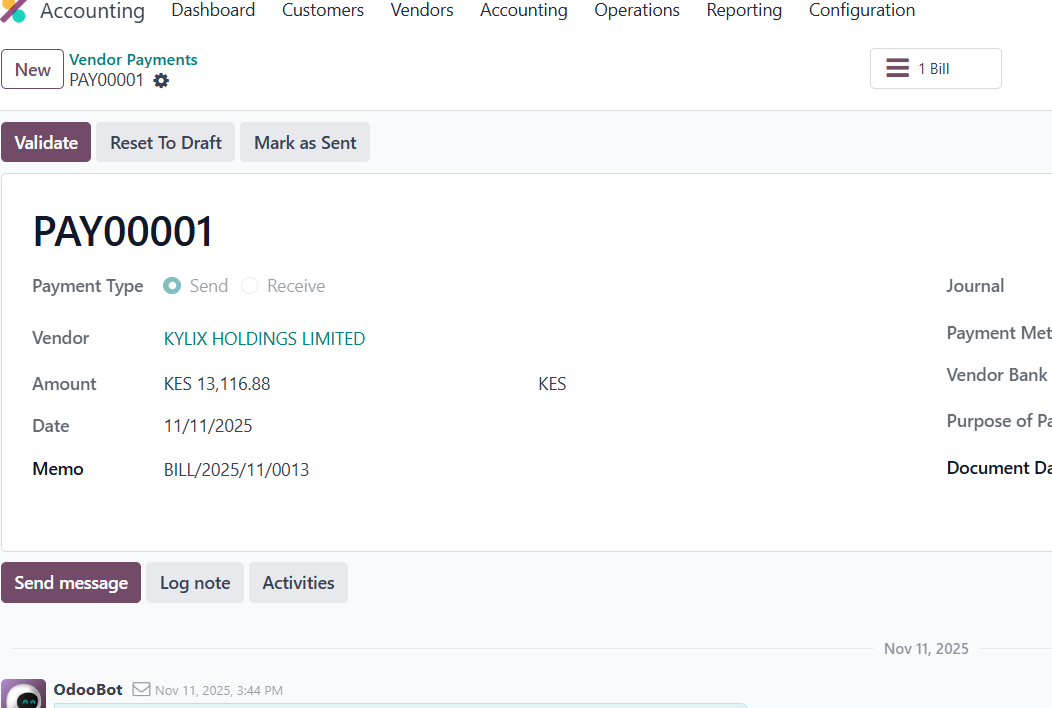
8). The vendor bill status changes to Paid
Inclusion of Taxes Process
Log in to an ERP with the accounting module
Accounting → Vendors → Bills
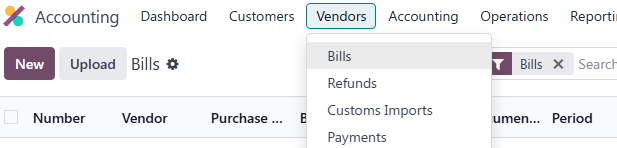
- Create a new vendor bill.
- Select the vendor.
- Add bill lines.
- Select the appropriate purchase tax.
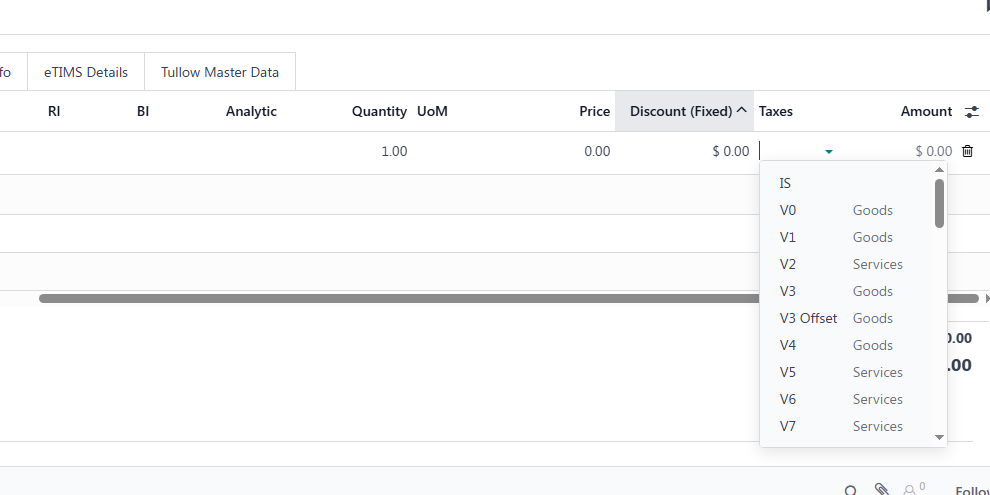
- Review the calculated tax amount.
- Post the bill.
Inclusion of Credit Notes Process
Log in to an ERP with the acconting module
- Navigate to Accounting → Vendors → Bills.

- Search for and open the posted vendor bill that requires correction.
- Verify the bill details and ensure it is in Posted status.

- Click the Credit Note button located at the top of the vendor bill.
- In the Credit Note wizard, enter the reason for the credit note.
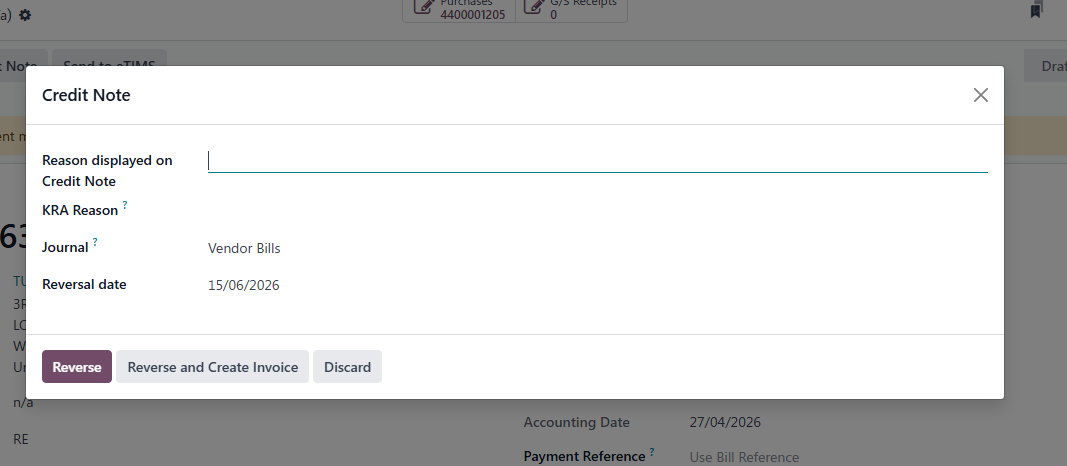
- Select the appropriate reversal date.
- Choose the journal where the transaction will be recorded.
- Click Reverse to create the credit note.
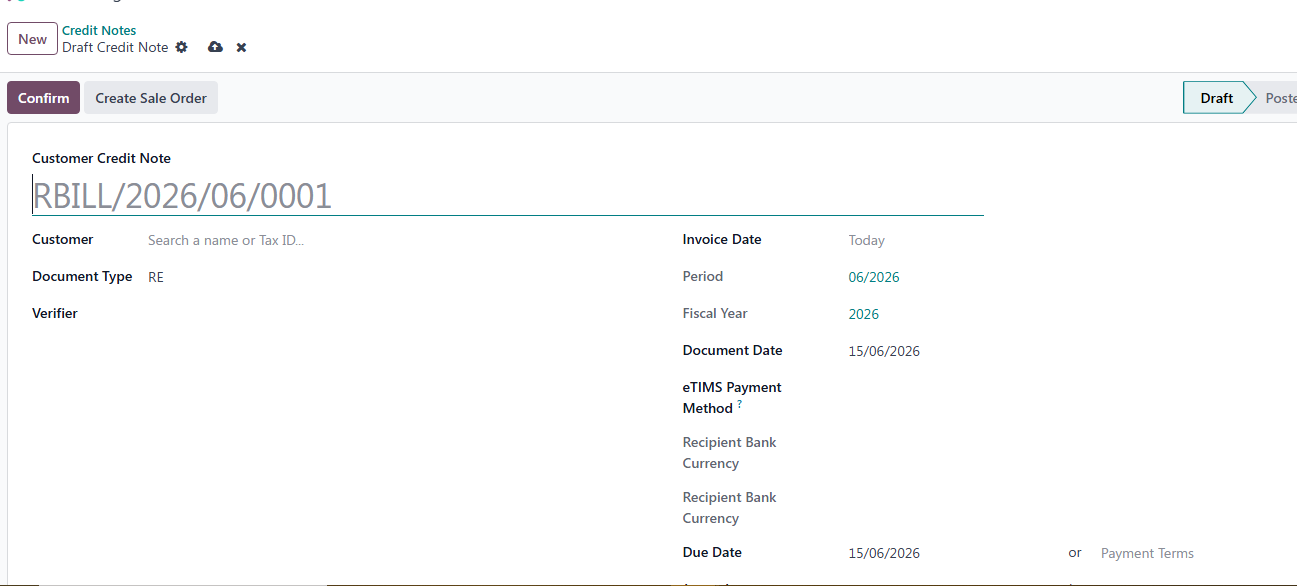
- Odoo will generate a draft vendor credit note based on the original bill.
- Review all bill lines, quantities, taxes, and amounts.
- Confirm that all information is correct.
- Click Confirm to validate the credit note.
- Once posted, Odoo automatically creates the accounting entries required to reverse the original vendor bill and reduce the company’s outstanding payable balance.
Document Sign-Off
| Role | Name | Date |
| Prepared By | Martha Ondigi | 15/05/2026 |
| Reviewed By | Joseph Okech | 15/05/2026 |
| Approved By | ||
| Authorized By |